Backing-up/Exporting
One of the best pieces of advice I ever heard is:
If your data is important to you at all, then you should back it up. What would happen if you suddenly lost it? How devastating would it be?
Backing up is such a simple step, and can potentially save you many hours of work, stress, and possibly your job (if the data is that important).
To backup a database, we simply need to export the database. To restore it, we need to import the database. I’ll show you how to do both using a few different methods:
Backing up a Single Database from within cPanel
In cPanel, you can download a copy of your database by simply logging into cPanel and go to the ‘Backup’ section.
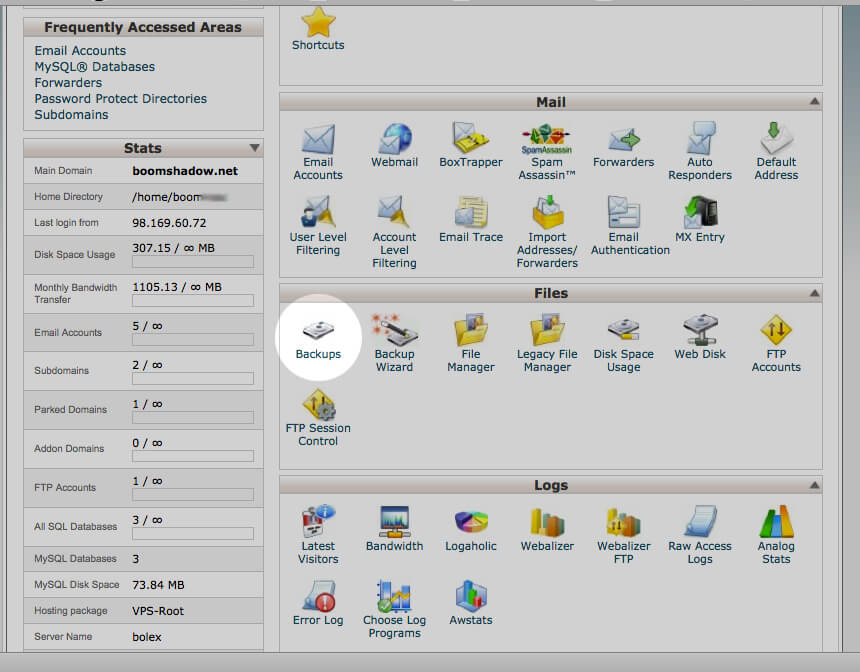
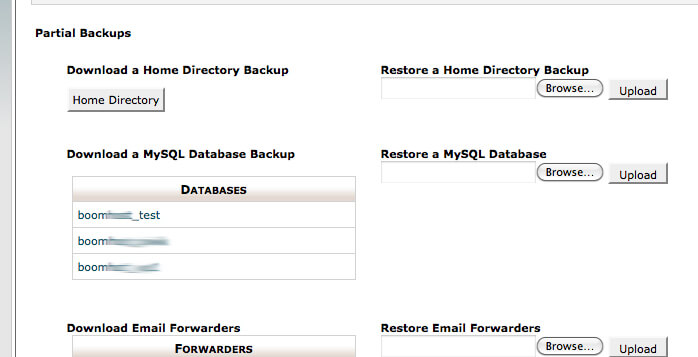
Then click on the link for your database name. It will prompt your to download your database in a compressed archive (tar.gz) to your local computer.
Backing up a single database with command line
If you prefer the command line, you can backup your database using a single command:
mysqldump -Q --add-drop-table your_database_name > file.sql Backing up all databases to separate files
If you would like to play it safe or know that you have many different databases that are all important, then you can run a ‘for’ loop to individually dump all databases to their own file.
Fist create a directory for all the dumps to go and create an empty list of all the database names:
mkdir /root/database_backups ; touch /root/database_backups/list-of-databases Then, run the for loop to dump the databases and generate the list of database names:
for db in `mysql -e 'show databases' | grep -v Database` ; do mysqldump -Q --add-drop-table $db > /root/database_backups/$db.sql && echo $db >> /root/database_backups/list-of-databases ; done Restoring/Importing
In the event that you’ve got missing data, corrupt tables, or generally something went wrong, don’t worry! You have backups that you can restore from. Here’s how you restore that databases back from the exports you made above.
Restoring from phpMyAdmin
First off, you’ll need to log into phpMyAdmin. From cPanel, it is found in ‘Databases’ section.
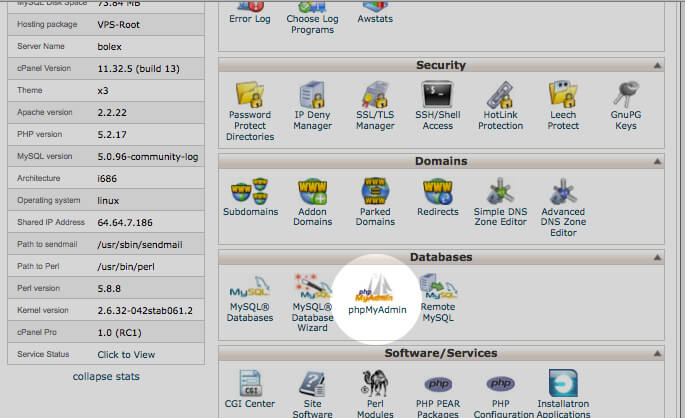
Once inside, you’ll select your database on the left-hand side. This is the database that you want to import that data into.
Warning: This will overwrite your existing tables.
Once you have the database selected, click on the ‘import’ tab at the top.
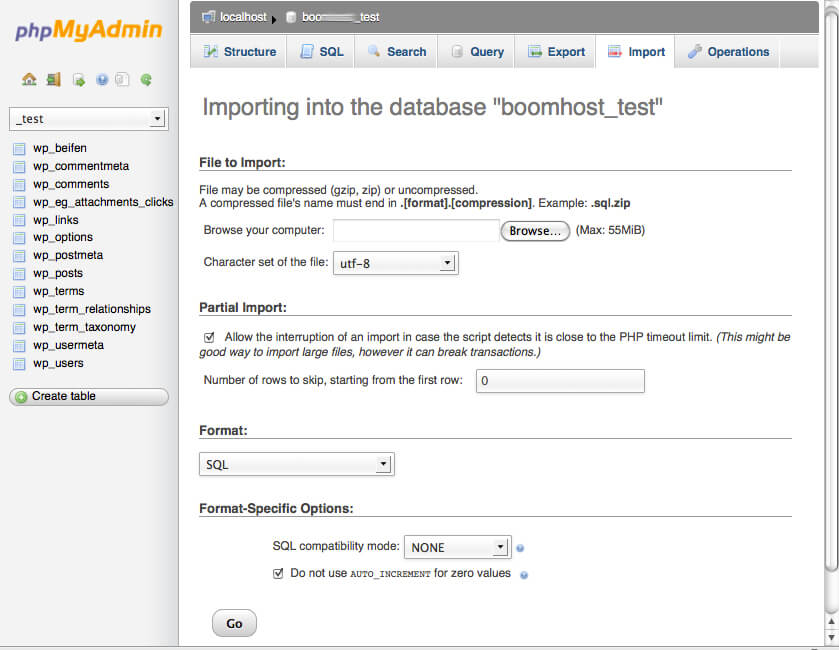
Click ‘Browse’ and navigate to the file on your local computer.
Look over the various options. Most times, you can just leave them as is. If you don’t know what the options are, I’d advise just to leave them set to default.
Hit ‘Go’.
Restore a single database from command line
If you are similar to me, you might prefer a command line. I think its much easier to import it this way as the command is so short & simple:
If you are logged in as root, simply run:
mysql db_name < file.sql Make note of the direction that the arrow (greater-than sign) is pointing. This indicates the direction where the data is going. In this case, the arrow points to the left towards the MySQL database name. This indicates that the data is being imported FROM the .sql file in-TO the server’s MySQL database, which is exactly what we want.
If you don’t have root access, you can still import but the command requires a couple more flags and that you know the database credentials:
mysql -p -u db_username db_name < file.sqlIt’ll prompt you for that user’s password. Enter it in and the import will begin.
Restore all databases from command line
Remember that command we did to export all databases to their own separate dump files? Well, lets say you wanted to easily import all of them back in for whatever reason. We just need to run another simple ‘FOR’ loop in order to get them back in. Basically, we are doing an individual database import, but for each database that is in that ‘list-of-databases’ that we generated earlier:
for db in `cat /root/database_backups/list-of-databases` ; do mysql $db < /root/database_backups/$db.sql ; done Once that finishes, you’ll have all your exported databases fully restored back as they once were: Fast, safe, and easy!
Final Thoughts
If you have a huge database, running a mysqldump can cause your entire website to go down. This is because you are locking the tables during the dump (cPanel backups can do the same thing). If you are worried about this, be sure to perform your backup export during a time of low site traffic. With that said, SQL backups are a great idea. An equally good idea is to occasionally try to restore your backups (to make sure they are good). Simply restore them to a different database name if you don’t want to overwrite an existing database.
Note about this article
This article is one I had written and shared with the ServInt blog as part of the ‘Tech bench’ series. You can view it on the ServInt blog here. They are using my article with my permission.
MySQL Logo - Copyright 2012 Oracle and/or its affiliates. All rights reserved. Used by permission.
