One of the critical parts of administrating your server is by logging into SSH as root. With the command line, you can roll up the proverbial sleeves and really dig in: installing software, changing system configuration, investigating problems, etc… But what about the security concern of logging into a system with all that control and you’ve only got a password? This is where Key authentication comes in.
Instead of typing in a password, you can generate an encrypted key pair that is used to authenticate you when logging in. The server will look to see if you have this key file on your computer instead. There is a good little overview of the process from cPanel here.
This is a great security measure to implement as it allows you to control which systems can access your server. You can also turn password authentication off and your server will be immune to SSH password attacks. This is major step in security hardening and is highly advised.
Generating the Keys
To get started, we are going to need to generate a Key pair on your computer (the public and private key). Load up a terminal and run:
    ssh-keygen -t rsa -b 4096
    # Or if you want to be on top of your security game,
    # set up a new ed25519 key (highly recommended):
    ssh-keygen -o -a 100 -t ed25519
It will ask where to save the key file. You can leave it at the default location.
Enter file in which to save the key (/Users/jacob/.ssh/id_rsa): id_rsa
Next, it will ask for a passphrase.
Enter passphrase (empty for no passphrase):
You can leave this blank if you simply want to leave the private key unlocked. This will make logins quite easy as you won’t have to type anything in and you will “auto-login”. However, for an added layer of security, you can set a password to unlock the private key.
It will ask for the passphrase again. Press ener to leave it blank.
Enter same passphrase again:
Finally, it will output confirmation of the keys’ location and the fingerprint:
Your identification has been saved in id_rsa.
Your public key has been saved in id_rsa.pub.
The key fingerprint is:
7b:2d:25:c2:2e:2a:1a:ea:76:3a:96:ed:1a:29:8b:9b
Copying the Public Key
Now you will need to get a copy of the public key you just made. Simply cat the file:
    cat ~/.ssh/id_rsa.pub
    ssh-rsa AAAAB3NzaC1yc2EAAAABIwAAAQEAwsIU0uzZVu6uf2GgM9B4Z7sNn5jMEs1yDrjvdI4ChXrkADegfltv0CESXknoU4NI57Dw0kyc3eJ7bADyI0uBH0PxDTZAOSKKyogsnRtgXbFLKHXpOOyiG51M9tjobObNo6SDmzbeVD5GzlmnPpgMMUoqpjYe3P45g6ouw/3Gcwt+BwZG5loSknk9lkndbyTmhb5gc4jAMYIQ3QAWCtPES04jyUWMFZ/oUn5bMaTKG2aHCgn0wTYR8ih3Ewptp0XV2z77WUmGnJV6t5wE1kZqltdh52aHTeRLoYAFoFWPt4i6sUjhFPufjeyxdXsSR5dsdqUFZRX1dsCJkGWZzfLb3w== [email protected]
Importing Key to the Server
If you need to add your key to a non-cPanel server, using command line, see my article here: Adding an Authorized Key
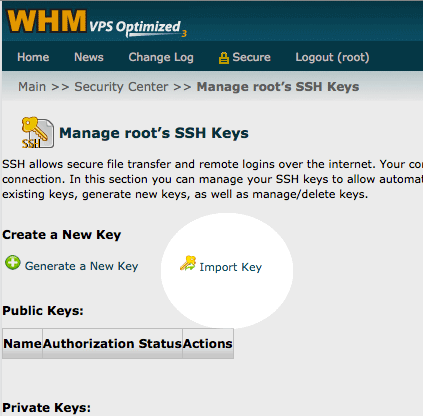
We’ll add the key to the server and authorize it (we have to tell the server that this particular key is allowed to access the server). Log into WHM and navigate to: Main » Security Center » Manage root’s SSH Keys. Click on ‘Import Key’
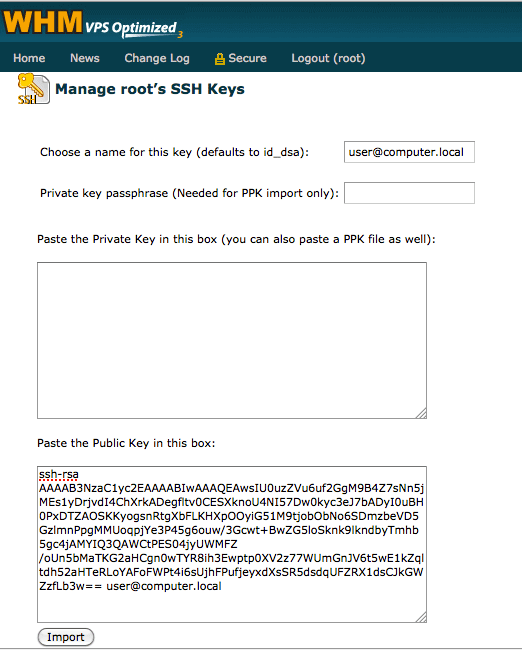
On the next screen, you will want to scroll down and look for the last box that says “Paste the Public Key in this box:”. Paste your public key into that box. Leave the other boxes blank. It will automatically fill in the name. Hit ‘Import’.
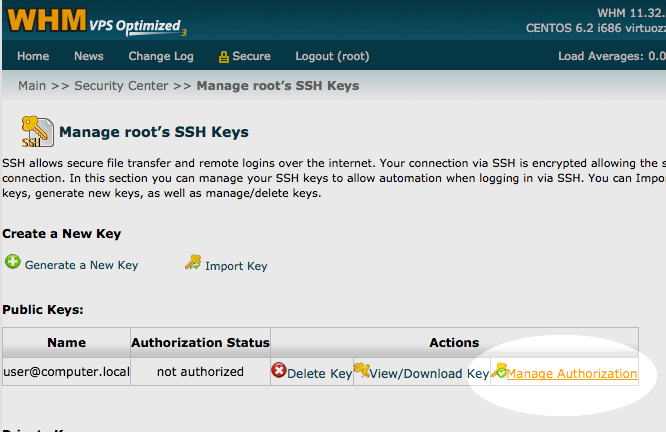
On the next screen it will tell you the import was successful. Click on “Return to SSH Manager”. This brings you back to the Key management screen. You will click on “Manage Authorization”
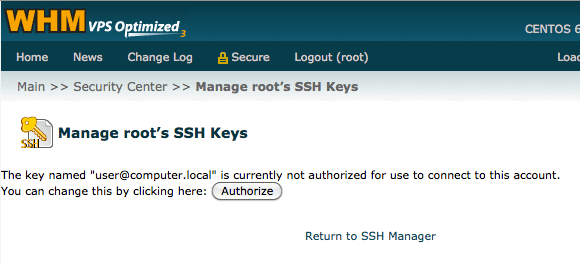
Finally, click on the button for “Authorize”.
You are done! Try logging into SSH and it should look for your key.
Going the extra mile: Disable Password Authentication
Now, you can take your security one step further and completely disable password logins for SSH. You will have no more fears of hackers trying to guess your SSH passwords.
To set this up, while still in WHM, navigate to: Main » Security Center » SSH Password Authorization Tweak. Click on “Disable Password Auth”
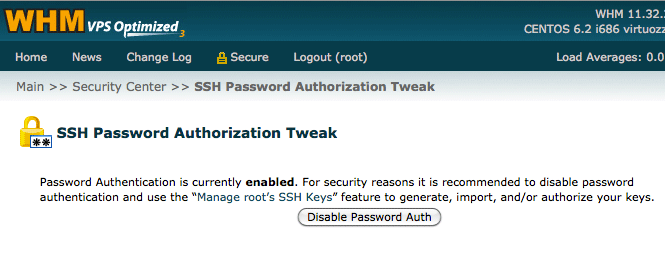
And that is that. As cPanel so eloquently puts it: Now, sit back and relax as hackers will no longer be able to gain ssh access through password cracking. They will, instead, receive errors like this:
Permission denied (publickey,gssapi-keyex,gssapi-with-mic).
Notes
The encryption method used for this was ‘RSA’. RSA is natively implemented in more places (it is the default key type on most generators and commercial RSA certificates are much more widely deployed) and it defaults to 2048 bit key length. At the time of this writing, for DSA to be compliant, it has to be exactly 1024 bit, which is less secure. The general consensus is that both DSA and RSA are pretty equal in security quality and speed when used merely for authentication. Either you choose will be fine as long as you follow safe security practices: use higher bit key encryption, only use SSH v2, keep your software up to date, and protect your private key.
References:
- http://security.stackexchange.com/questions/5096/rsa-vs-dsa-for-ssh-authentication-keys/5100#5100
- http://encryptme.wordpress.com/2011/05/25/ssh-keys-rsa-vs-dsa
- http://www.linuxforums.org/forum/security/48093-openssh-user-host-authentication-rsa-versus-dsa-provides-stronger-security.html#post498142
Note about this article
This article is one I had written and shared with the ServInt blog as part of the ‘Tech bench’ series. You can view it on the ServInt blog here. They are using my article with my permission.
