
Today I am going to show you something pretty nifty: how to forward a copy of all incoming and outgoing mail for a particular email user. If you are the cautious type, or simply the email hoarding type like myself :P , this can be really handy for easy archival of all your mail. Exim can be configured so that your server will automatically (and quietly) send a copy of every message you send and receive over to another email address. This is all done without you noticing anything extra in the ‘To’ or ‘CC’ fields. Silent and effective.
This could also be used to secretly keep track of your users’ emails and monitoring what they do. I had a friend of mine recently ask me to help him set this up for him on a new Sales employee he had. He wanted to make sure they were taking care of the clients properly. While I may not personally agree with the privacy concerns of spying on another person’s email, I acknowledge that it can be used in this purpose and there are those out there who have no problem implementing it for this reason.
However, that is an argument of principles best saved for another time. I personally believe that all knowledge is power and people will do with their lives as they feel is best. I will show you the tech side of how to set this up; you can do with it as you please.
Note: You will need SSH root access to make the following changes
Find the Exim System Filter file
The changes we are making will be to the ‘System Filter File’. Obviously, we’re gonna need to know where it is located. It could be different on your server, so be sure to look it up.
Log into WHM and navigate to the section: Main » Service Configuration » Exim Configuration Manager. Alternatively, you can simply type ‘Exim’ into the search bar and it will be the first result.
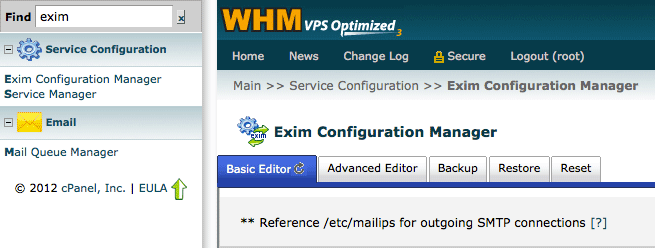
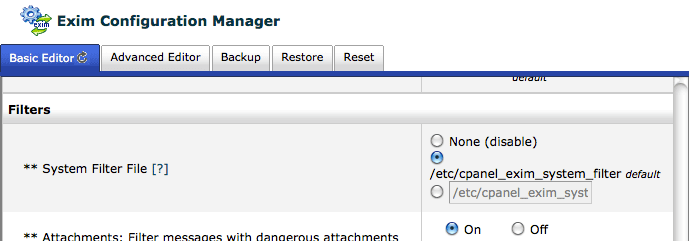
Next, scroll down and locate the “System Filter File” section. It should list the default location. On my server, it is:
/etc/cpanel_exim_system_filter
Leave WHM open for now because we will be coming back to it shortly.
Edit the Exim System Filter file
One thing I must note is that you will not actually be directly editing the system filter file. cPanel staff has stated that if you do, the changes will get overwritten during cPanel updates. Instead, we are going to make a copy of it and make our changes to the new custom file. cPanel updates will not change your custom file.
Note: Exim version changes, however, WILL overwrite custom files. When cPanel 11.34 comes out, Exim is likely to get a version change. Make sure you back up this file ahead of time.
Let’s get started. Log into SSH and copy the system filter file:
cp /etc/cpanel_exim_system_filter /etc/cpanel_exim_system_filter_custom Next, edit the newly made file:
nano /etc/cpanel_exim_system_filter_custom And place the following template at the very bottom:
### FORWARD ALL INCOMING AND OUTGOING MAIL FOR A USER ###

if ("$h_to:, $h_cc:, $h_bcc" contains "[email protected]")
   or ("$h_from:" contains "[email protected]")
then
   unseen deliver "[email protected]"
endif
The code above will send a copy of any email that is sent “To”, “CC”, and even “BCC” to your address. It will also send a copy for all outgoing mail. Be sure to replace the example addresses above with your actual email addresses. Save and exit the file.
Reconfigure & Restart Exim
Now, you need to go back to WHM and change the system filter file location. Basically, we’re going to reconfigured Exim to use that new file we made instead of the default one. Copy and paste the full path to your new file into the 3rd field:
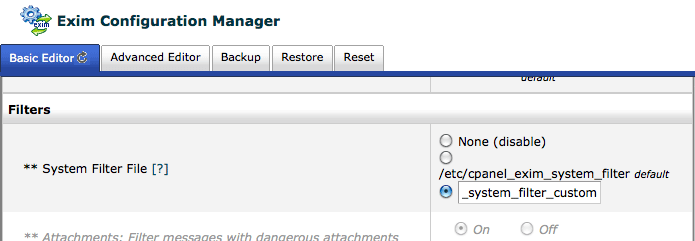
Scroll down and hit ‘Save’. Finally, all you need to do now is restart Exim:
service exim restart And that is that! Your server will now start archiving all your email to the address you specified. You’re going to start getting a lot of extra mail at that address so be sure you have some automatic message organization setup such as User level filtering in cPanel or Message filters in your email client to sort them all the messages into folders. If not, you may have a little bit of a messy inbox next time you log in ;)
References
Special thanks goes out to cPanel Tristan. You always know your stuff and are great at helping! I really enjoy getting you in the ticket system and then also finding fixes in the forums that happen to be posted by you as well. It makes my day every time. Research for this article found on the cPanel forums here.
Also, thanks goes to Vinayak on the cPanel forums here.
Change Log
This post has been updated since it’s original publishing. Here is a list of changes:
- 11/07/12: As of the release of the new WHM 11.34, some of the archive tasks of this article can be done directly with cPanel. cPanel now has it’s own built-in support for email archiving. See my WHM 11.34 features article here